Installing a Linux Server on a Raspberry Pi
Knowledge isn't always enough. Hone your skills by building your personal network starting with a Linux Server... On a Raspberry Pi!

Introduction
I would say this article is a sort of "spiritual sequel" to my first blog-style post: Building A Home Network Part 1
Nothing useful going on there, just me talking about starting something but not getting around to it... UNTIL NOW!
I just so happen to have a Raspberry Pi 3 collecting dust on my shelf, and I thought setting up a Linux server on it would be a great place to start!
Turned out to be quite the ordeal, so I documented the steps I took in this article.
It does mean this is quite a long read, but hopefully it will give you everything you need to get started if you plan to add a pi to your network!
In this article, you will learn how to
- Install an Ubuntu Server on your Raspberry Pi
- Connect the pi to your home wifi network
- Set Up the SSH server for remote connection
- Connect to the internet by setting up a default gateway and configuring name resolution
There's a lot to cover so take your time and read through carefully.
Ubuntu Server Installation
Go to https://www.raspberrypi.com/software/
If the link has changed, then just search for it on google by typing "raspberry pi OS" or "Raspberry pi imager". It shouldn't be too hard to find.
You should find yourself on a page like this:


Once you've installed and run the imager, you should be greeted with a window shown above. Pick the setting that work for you.
I was using a Raspberry Pi 3 and went for the latest (at the time of writing) Ubuntu server. Don't forget to slot the SD card for the pi into your computer then select it in the storage section.
In case you are wondering, Ubuntu Server is just Ubuntu without a GUI. You're only means of interacting with it is via the command line.
You will need a wired keyboard and a screen, so you can interact with the pi.
Default ssh username and password: ubuntu
Enabling Wi-Fi
In this section you will be setting up the network config file so that the pi will connect to your wifi.
After the imager is done, you can go into the SD card from your computer and see all the files that were added.
Look for a file called network-config. This is a YAML file where you can connect to your wifi. Open it using a text editor of your choice.

If you scroll down to the network section you can find the wifi section.

Uncomment the highlighted section shown in the figure above and replace myhomewifi with your wifi BSSID (the name of the access point).
Also, replace S3krit with you wifi password.
Netplan
If your pi managed to connect to the wifi when booting up, then you can skip this section.
Docs: https://netplan.readthedocs.io/en/stable/
You can check your network interface using the ip command to see if there's a device that is connected.
If, like me, your pi did not connect to the wifi on boot, then you can connect using Netplan.
Navigate to /etc/netplan. Here you will find the configuration file for the wifi.

Use sudo to open the file and you should see something similar to the network-config file from before.
network:
  version: 2
  ethernets:
    eth0:
      dhcp4: true
      optional: true
  wifis:
    wlan0:
      access-points:
        <your_wifi_ssid>:
          password: <your_wifi_PSK>
      dhcp4: true
      optional: true
netplan network settings
Make sure you replace <your_wifi_ssid> and <your_wifi_PSK> with the network name and password, respectively.
Save and exit the file, then reboot the pi.
This time when you use the ip command, you should see an entry for wlan0

Accessing Pi Using SSH
First thing you should do is check if the ssh server is running.
Docs: https://help.ubuntu.com/community/SSH/OpenSSH/Configuring
Use systemctl status ssh (you don't need sudo to check the status of a service).
You should see something like this.

My pi came with ssh service installed and running out of the box.
If, for whatever reason, your ssh service is deactivated, you can activate it with
sudo systemctl start ssh
Use sudo systemctl stop ssh to switch if off again.
You might also want to make sure that the service is enabled. Use
sudo systemctl enable ssh
Use sudo systemctl disable ssh to disable it.
In case you are wondering, the difference between start/stop and enable/disable is whether the status of the service persists when booting up the pi.
If you simply want to switch the service on or off, use start/stop.
Enable/Disable changes a setting in the ssh config which tells Linux to start the service on boot if enabled, or keep it off if disabled.
You will be using ssh to connect to your pi, so it makes sense to enable it.
SSH Config File

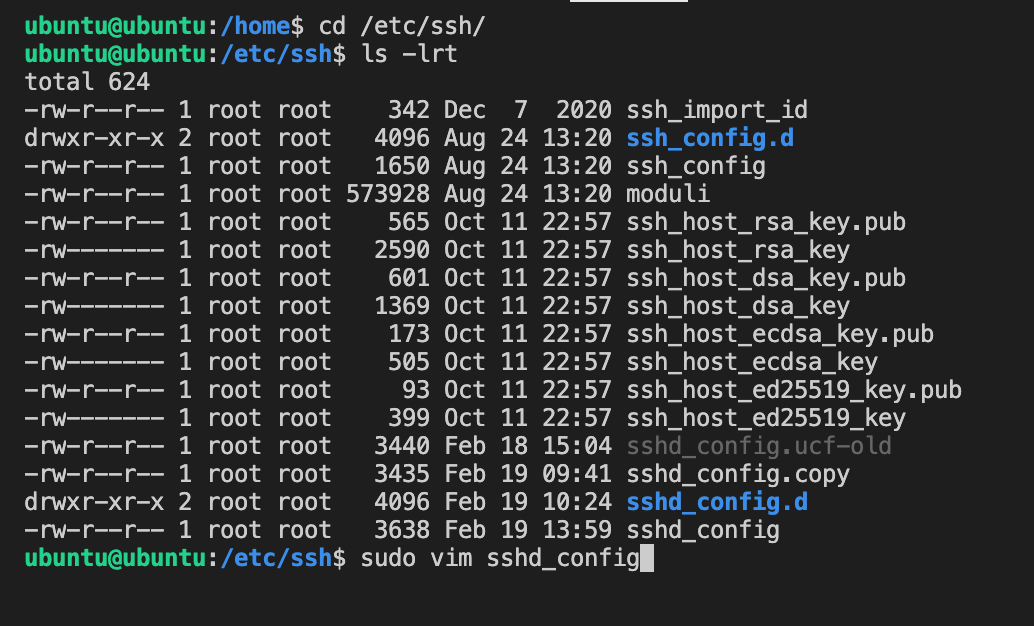
As shown above, navigate to /etc/ssh folder.
Here, you will find the config file for ssh, sshd_config
For safety, it is a good idea to make a copy of a config file whenever you are making changes, in case you make a mistake and have to restore it.
Use sudo cp sshd_config sshd_config.copy to make a backup.
Now open sshd_config - make sure to use sudo to edit.
Make sure the following configurations are set:
AllowAgentForwarding yes- To allow agent forwarding.PermitRootLogin no- Prevents connections as root user (for safety).PubkeyAuthentication yes- Allows connecting through public and private keys.PasswordAuthentication yes- Requires password to connect.
Also, take note of any Include statements. Like this

Think of this as in an import statement from other languages.
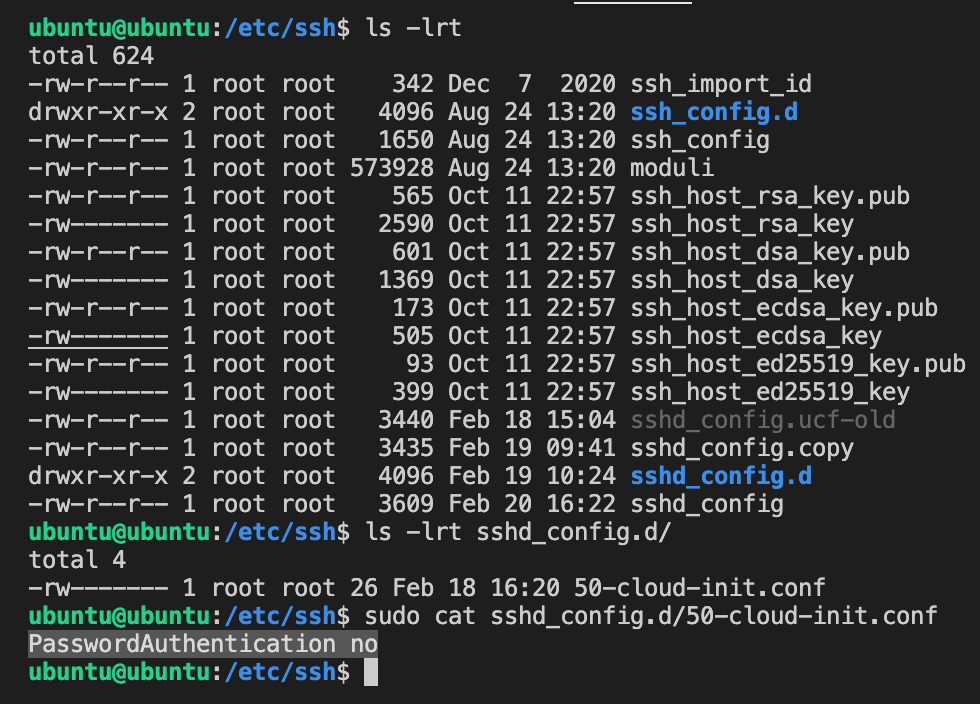
If you take a close look inside the /etc/ssh folder you will notice a directory called sshd_config.d
The Include /etc/ssh/sshd_config.d/*.conf is telling the config file to import any additional config settings from the config files in sshd_config.d
I would suggest commenting out the include statement as these files might override any of the configurations you made in sshd_config

In the figure above, you can see that 50-cloud-init.conf has PasswordAuthentication set to "no". We need this to be "yes".
Once you're done, save the changes and go back to the terminal.
To apply the changes, you need to either reload the ssh server. Use
sudo systemctl reload ssh
You can substitute reload for restart
reload applies the config changes without stopping the service, whereas restart does what you think it does, and also applies the changes.
You should now be able to connect to the pi
Use ssh <username>@<pi_ip> from another machine on your network to connect

For an easier and more convenient way to connect, check out the SSH Config File section of my article on SSH Forwarding and Tunneling.

Getting Internet Access
Setting up Default Gateway

If you find that you are connected to the network but you cannot reach the internet then it is likely that you need to manually setup your gateway IP in the route table.
A route table is a data table that stores information regarding the destination that is bound for certain IPs.

Currently the route table only directs you to hosts inside the 192.168.0.0/24 network, through the wlan0 network interface.
In order to access the internet, we first need to find out what the gateway ip is.
In networking, a gateway (or default gateway), is just a device that sends local network traffic to another network.
In this case, you want your pi - which is on you local network - to access the internet.
There are many ways to find your default gateway. If you're using a MAC, then you can use
route get default
to find your default gateway.

Looks like the gateway for the private network is 192.168.0.1
This is pretty standard as it is also the IP of the router, which is how your other devices access the internet.
Go back into the pi and added this ip to the route table as the default gateway using
sudo ip route add default via <gateway_ip> dev <network_interface>

Now try ping again

Awesome, now we have a means to reach the internet!
There's still one problem: We can't resolve URLs.
Enabling Name Resolution
Seem the pi can ping ip addresses but it can't resolve URLs.

This also mean the pi can't perform updates.
Good ol' sudo apt update won't do jack.
There's a pretty simple way to solve this.
You need to add a nameserver to /etc/systemd/resolved.conf so the pi knows where to go if it needs to resolve a URL.
If you need a refresher on how the DNS works then take a look at


When you open the file for the first time, look under the [Resolve] section and uncomment DNS=
You can use your default gateway, which was set in the last section and can be found using ip r
It's handy to use a few nameservers so your pi has a secondary and tertiary DNS to fallback on in case the primary fails. 1.1.1.1 is the ip for a Cloudflare nameserver, and 9.9.9.9 is a Quad9 nameserver.
Another well-known servers is google's 8.8.8.8
Once you've added the nameservers, save and exit the file.
Next is to restart the daemon that uses this file.
sudo systemctl restart systemd-resolved.service
Now you're changes should persist on boot, the pi should be able to perform an update and upgrade.

And with that, we have a fully functioning Linux server on the raspberry pi!
We covered a lot here, but it's only the first step to setting up your home network. Hope you found this useful!

